Hey there! I wanted to show you guys my beading table because I know some of you may be looking for one. From the picture you can see my current project on the table which is another vintage button necklace. I am working on the spiral chain at this point. I purchased the beading table on Ebay.com. The height is adjustable and the table angle is adjustable too. You can move it right up to where you are sitting. It is a great beading table. It is called a "Herman Miller Scooter" table. You can find it for a variety of prices on Ebay.com. If you keep checking, you can usually get one for an affordable price.
Monday, September 1, 2008
Monday, August 18, 2008
Bead Embroidery Resources and Tutorials
I wanted to post some bead embroidery tutorials and resources to get you
started with bead embroidery. Here are two books that I own that are
both inspiring and helpful.
started with bead embroidery. Here are two books that I own that are
both inspiring and helpful.
Bead Embroidery, The Complete Guide by Jane Davis
Beaded Embellishment by Amy C. Clarke and Robin Atkins
A great online bead embroidery tutorial is avaliable too. It is Adventures in Bead Embroidery by The Lone Beader.
Tuesday, May 13, 2008
Bead Embroidery Necklace - Mother's Day Gift
Go ahead, call me the "lazy blogger" because I haven't posted in a while. I just wanted to show you guys the finished piece from my earlier posts. This was for my mother for mother's day this year.
I have many projects in the works... at least three. I need more beads to finish them.
... and you will certainly see more bead embroidery from me to come.
Thursday, February 1, 2007
Bead Embroidery on eBay.com
I was browsing on eBay.com for some bead embroidery and actually found some. This piece is a framed bead embroidery piece of the Rocky Mountains. "Pilot and Index Peaks" is the title of the piece. Click on the link to learn more about it and see more pictures. The beads are sewn onto painted denim which I thought was a nice fabric choice for this piece. Crystals are used for stars in the sky. This piece is listed for a reasonable price. For such a large piece, I think it should be priced higher for all the work that has been put into it.
I am actually going to be doing more bead embroidery myself after I get "New Growth" (see previous posts) finished. I have at least four pieces I want to do. There is so little time when it comes to beading.
Friday, January 26, 2007
I Need Color - Bead Stringing
My mother says when you get older you tend to be attracted to bright colored things. I wonder if that is why you see little old ladies with blue and purple hair.
I made this necklace last night because I was craving some color. These cold and cloudy days with no outdoor floral displays can make anyone gloomy.
This necklace was inspired by another necklace using colored lampwork beads and complementing seed beads in the book, "Creative Beading: The Best Projects from a year of Bead and Button". This is a great book. It has over 80 projects for you to try. You can also use it as inspirations for new ideas. Stringing, Wirework, Beadweaving (Stitching), Bead Crochet, Embroidery, and Macrame projects are all included in this 256 page book.
This multi-strand necklace uses lamp work beads with complementing size 10/0 seed beads. Maybe you have some lampwork beads in your bead collection you can use to make your own.
Wednesday, January 24, 2007
All Glued Up - Bead Embroidery
Here is the result after gluing the beaded Lacy's stiff stuff to the brass blank. I also glued the deer leather to the other side of the brass blank. After trimming the leather and the Lacy's stiff stuff, I whipped stitched the deer leather to the Lacy's stiff stuff. ( Yes, I did break a needle sewing through the deer leather) You can use Ultrasuede, I just have lots of deer leather. The strings through the piece in the picture are for finding holes later when I need to connect the chain to the embroidery. The brass blank was made with two holes so you can attach a chain to the finished piece.
Labels:
bead embroidery,
beading,
beads,
beadwork,
cabochons,
glass beads,
handmade jewelry,
seed beads
Tuesday, January 23, 2007
Tater Tot Hotdish
This post is for THE LONE BEADER. This recipe contains NO BEADS.
"Tater Tot Hotdish" is a recipe shared by my friend from Minnesota. She told me several years ago that it was her husband's favorite food that she cooked. After I found out that "hotdish" is the same thing that we call here in the south, "casserole", I was intrigued. Anything with tater tots has gotta be good I thought. After making it... I found out... it really is very good. This is not to be considered diet food by any means. I'm afraid to know how many fat grams and calories are contained in this delicacy.
There are many variations of this recipe which can be found on the Internet. Here is the recipe I used. It is very easy to make.
Tater Tot Casserole
2 lb. Ground Chuck
1 Onion, chopped
12 oz. Sour Cream
10 3/4 oz. can Cream of Chicken Soup
10 3/4 oz. can Cream of Mushroom Soup
16 oz. Cheddar Cheese, shredded
1 lg. Bag of Tater Tots
1 Onion, chopped
12 oz. Sour Cream
10 3/4 oz. can Cream of Chicken Soup
10 3/4 oz. can Cream of Mushroom Soup
16 oz. Cheddar Cheese, shredded
1 lg. Bag of Tater Tots
Brown ground chuck and chopped onion. Season with salt and pepper. Drain. Layer other ingredients into baking dish. Top with large bag of Tater Tots. Bake at 350 degrees for 1 hour or until brown and heated through.
ENJOY!
Sunday, January 21, 2007
Moving On - Bead Embroidery
I am finished with the bead embroidery. I did end up flipping the bugle beads from a vertical to a horizontal position simply because I could see white space showing between the cabochon and the bugle beads.
Now I have to mount the work onto the brass blank and make a chain to go with the bead embroidery. I have enjoyed the process and learning experience making this piece.
I am so hungry right now. My tater tot casserole is almost done
Now I have to mount the work onto the brass blank and make a chain to go with the bead embroidery. I have enjoyed the process and learning experience making this piece.
I am so hungry right now. My tater tot casserole is almost done
Labels:
bead embroidery,
beading,
beads,
beadwork,
glass beads,
handmade jewelry,
seed beads
Thursday, January 18, 2007
"New Growth" - Bead Embroidery
Since I started over again with new beads and a new design, this attempt is the one I will stick with. I am calling it "New Growth" because it looks like a baby plant sprouting out of the ground. Even now I want to take it out again and start over, but I showed it to my mother and she seems to like it... so I am keeping this design as is. Now I just got to finish the other half.
Labels:
bead embroidery,
beading,
beads,
beadwork,
glass beads,
handmade jewelry,
seed beads
Tuesday, January 16, 2007
Fresh Start - New Beads
Here are my new beads that I will be using for my bead embroidery necklace. I thought the beads I was using were too dark. These colors are for the most part much lighter. Time for a fresh start. I hope I don't mess too much up by pulling out all the other beads.
The circular bead in the middle is a cat bead made out of bone. I just had to have him. Click the picture to enlarge it and get a close up of the cat.
I used to have three cats, now I just have one. His name is "Tribble". If you are a "STAR TREK" fan then maybe you will remember the episode, "The Trouble with Tribbles". They were these little "alien" pets that were basically a big fur ball. The "Tribbles" detested the Klingons.
Labels:
bead embroidery,
beading,
beads,
beadwork,
glass beads,
handmade jewelry,
seed beads
Monday, January 15, 2007
Bead Embroidery
Here is what I have done so far on my first bead embroidery project. Guess what? Except for the stone, I am going to be pulling out all of it because I am not happy with it. I love size 11/0 beads for everything else.. but geez.. for bead embroidery.. they are enormous...especially since this is a small piece vs. a large one. This is going to be a necklace for my mom, so it must look spectacular. The teacher for the class did warn us that we might be pulling out some of our work before we were happy with it. I am going to go to my local bead store to get more 15/0 beads and other beads to sew onto the piece. So.. starting over.
My bead embroidery class was VERY disappointing. Not very many people were prepared. One person used interfacing for the beadwork that was so thin, the beads tore through it. The actual class consisted of the teacher drawing the back stitch on a dry-erase board and that was it. What a waste of money that was. I already knew the back stitch.
Hopefully after I pull out these beads and get more size 15/0 beads, things will get better. So... How many times have YOU started over with a jewerly piece?
Labels:
bead embroidery,
beading,
beads,
beadwork,
glass beads,
handmade jewelry,
seed beads
Thursday, January 11, 2007
Beads Losing Color - Bad Beads Part II
I have been researching on "Google" about beads since I was still frustrated and confused about beads losing their color. I have found out some information, so I will share it with you.
According to some people, the country origin and "brand" of beads is important in determining the finish quality of the beads. However, others disagree and state it is the "type" of bead that determines if a finish will last. This article about beads I found was very helpful: http://www.beadwrangler.com/aboutbeads.htm
My local bead store has a disclaimer on their website. Here it is: "NOTE: The finishes/colors on beads that are metallic, galvanized, or dyed may rub off or bleed with handling. Please use a spray fixative like Krylon with these beads."
My conclusion: Always spray your beads if you want a permanent color finish or if you just are not sure about the finish of the beads. I found that no matter what brand or origin of the beads..... no bead is perfect. Sad, but true.
Tuesday, January 9, 2007
Bead Embroidery Class Preparation
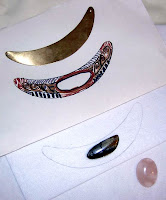
I am so excited because a bead embroidery class that I am taking is this Saturday. The teacher told us to get some cabochons ready that we would like to use in the class, so I have picked these two. I have chosen a picasso jasper and a rose quartz cab. These cabochons have been glued to Lacy's Stiff Stuff using E6000 adhesive. As you can see by the picture, I have a design that I might try to use with the brass blank that I purchased. I plan on using colors that will match and compliment the picasso jasper ( probably 11/0 and bugle beads). As far as the rose quartz goes, I am planning on making a keychain with it using bead embroidery.
I plan on doing much bead embroidery in the future because it is so beautiful. I will post a picture after the class to show how much I got done in the four hour class.
Labels:
bead embroidery,
beading,
beads,
beadwork,
cabochons,
handmade jewelry,
seed beads
Friday, December 22, 2006
Bad Beads
While making this last necklace, I noticed the beads were losing their color. The seed beads were originally copper brown, but when I started using them, they started losing their color. They only lose their color when they are handled or if you roll them around on your fingers. These are Czech beads. From now on, when I buy metallic coated beads, I will roll them around in my fingers to make sure I don't get a bad batch of beads... a bead test... before I leave the store. Has anybody else had this problem before?
Picture: Beads on the left were the original color. Beads on the right are beads that were handled and lost their color.
Thursday, December 21, 2006
Completed Vintage Buttons Necklace
Here is the completed necklace. I used peyote stitch all around the vintage buttons pendant with size 11/0 and 15/0 seed beads. I used the "rapid decrease" method in the above linked document to make sure my stitches were tight around the pendant. The bail was made with 16 rows of peyote stitch folded over and stitched. For the back of the pendant, I glued deerskin leather to the Lacy's Stiff Stuff and whip-stitched the edges.
I used three needles making this necklace...I don't remember why, but two of them broke. I'm glad I met my deadline for making this. I had wanted to finish my necklace before Christmas Eve to show to my aunt... so now I have time to wrap my Christmas presents and cook and not have to worry anymore about getting this done.
Monday, December 18, 2006
Vintage Buttons Necklace Too
I finished the spiral necklace today. I do like the way it turned out, I just wish I would have used dark brown 8/0 beads instead of copper 11/0 beads. I think the dark brown beads would have gone better with the button pendant.
I just glued the vintage button pendant to some Lacy's Stiff Stuff, so I am waiting for it to dry. I was going to stitch around the pendant using a netted technique, but the back of the pendant would be seen and it is ugly. I decided to glue it to some Lacy's Stiff Stuff instead and will use peyote stitch to embellish the pendant.
Friday, December 15, 2006
Vintage Buttons Necklace
I now have my beads from the local bead stores. Size 11/0 Copper brown beads and cream color beads are going to be used in the necklace for the vintage buttons pendant. The necklace is from the "Quick Stitch Beading" book produced by Bead and Button Magazine. The necklace is going to be similar to the one on the front of the book with the large netted pendant. It uses a two needle stitch with a three bead spiral embellishment. This will give it the look of a spiral rope. I have a while to go before the necklace is finished (see picture). Thankfully, Christmas is 10 days away, so I think I can make my deadline.
Wednesday, December 13, 2006
Vintage Buttons
Vintage Buttons are extremely fun to look at! I can just sit for hours looking at them. I remember as a little girl looking through my grandmother's button collection one by one. I would have loved to have her entire collection of buttons. Here are some of her buttons in a jar I was lucky to get after my grandmother passed away. I have had this jar of buttons for a few years and finally decided that I needed to go ahead and make SOMETHING with them besides just using them in a clasp. I wanted to make them a focal point in a jewelry piece. I decided the two buttons in the front of the picture I am going to use as a pendant. I have already glued the two buttons together with E6000 adhesive, but I need some more bead colors to get started. I think the top button is Bakelite, but I am not positive.
My goal is to get a necklace made before Christmas using the two buttons as the pendant. Tomorrow I will go shopping for the rest of the beads I need.
Tuesday, December 12, 2006
Christmas Bracelet
Here is a bracelet I made in November to give to my sister for Christmas. It is from a kit called, "Wisteria". It uses glass seed beads and flower beads. Fringe technique and bead stringing was used to make this bracelet. I hope she likes it. She doesn't know I have a blog yet... this is why I can post it here.... he he
All my Christmas shopping is done now! Yeah!
Saturday, December 9, 2006
Cabs from the Show
Here are the cabochons I bought from the Jewelry, Gem, Mineral, and Fossil show today. I didn't spend too much money. The most expensive cab was $5.00. I plan on using these in bead embroidery projects and making key chains using bead embroidery. I will post a picture once I make something with these.
Picture: blue glass, cross stone, labrodorite, rose quartz, and various agates.
Subscribe to:
Posts (Atom)